Wednesday, July 8, 2015

Provision additional lookup fields with CSOM

When you create a lookup field in SharePoint, you’ll have the option to add additional fields of the source list to your target list. When you create this from the UI, you check those fields on creation of the lookup field. But when you create this from your provision code, you can’t find any parameters on the lookup field itself.

The key for doing this in the code is the method AddDependentLookup on the Fields collection of the target list. To provision this lookup, I created the following method in my provisioner:

Please note that the lookupFieldId should be the fieldId of the field you want to add to your target list, and there should be another ‘primary’ lookup field configured between the two lists. The displayName is free to choose, this one will show up as column heading for instance in your target list.

Friday, August 15, 2014

SharePoint workflow variable [Current Item:Path]

I needed some documentation what values the [Current Item:Path] workflow variable contains. I couldn't find any examples online, but wondered if this variable contained a server relative URL or a site collection relative URL to the path of an item.

It turned out this path is server relative. Some examples:

http://site.local/Shared Documents/test.docx
/Shared Documents
http://site.local/Shared Documents/Folder/test.docx
/Shared Documents/Folder
http://site.local/sites/test/Shared Documents/test.docx
/sites/test/Shared Documents
http://site.local/sites/test/Shared Documents/Folder/test.docx
/sites/test/Shared Documents/Folder


Sunday, March 30, 2014

Development VM for SharePoint 2013 on Azure with MSDN

SharePoint 2013 – Hardware needs

To run a SharePoint 2013 development environment, you need a machine with decent specifications. SharePoint 2013 needs at least 12 GB of RAM to run properly, and multiple cores to keep the stuff going. As my current laptop lacks this kind of specifications, but fortunately I currently have a MSDN Premium subscription, which includes a monthly credit of €75 for Windows Azure. Besides this credit, Microsoft made some MSDN specific images available, which give you a fly start because all the needed software is already installed (SQL Server, SharePoint, Visual Studio).

There is some information available on the web about these Visual Studio images, but I found it was a bit out of date, so I wrote my own install guide. I want to create a simple development environment for SharePoint 2013, so I choose to setup a single machine farm without an AD (so I do not need another AD machine).

Configuration steps

MSDN subscription with Azure

You need to create your VM in Azure with an account connected with MSDN. If you didn’t set up Azure with your MSDN account, start at https://msdn.microsoft.com/subscriptions/manage/ to start your Azure MSDN benefit.

Set up a Virtual Machine

If you already set up this account, or after you set it up, go to the Windows Azure Management portal.

Create a new machine
clip_image002

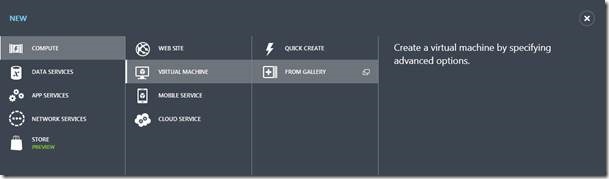
Click New - Compute - VM - From Gallery to create a new Virtual Machine in your Azure environment. A wizard will guide you through the process for a new VM.

Choose an Image
clip_image004

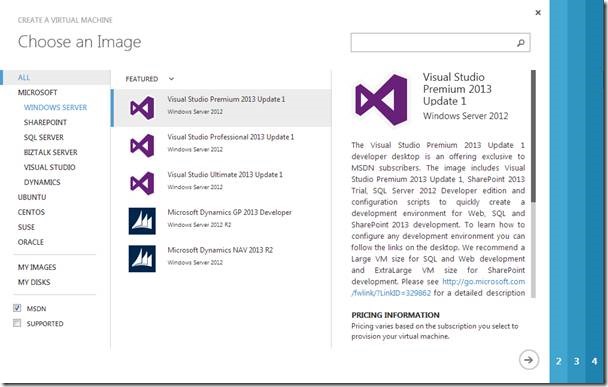
As a MSDN specific image is needed, check MSDN in the left bottom. Now you can create a VM based upon a specific Visual Studio version. Choose the MSDN version eligible to your MSDN subscription (or downscale, as the lighter the version is, the lower the needed disk space will be, and the lower the costs will be).

Virtual Machine configuration
clip_image006

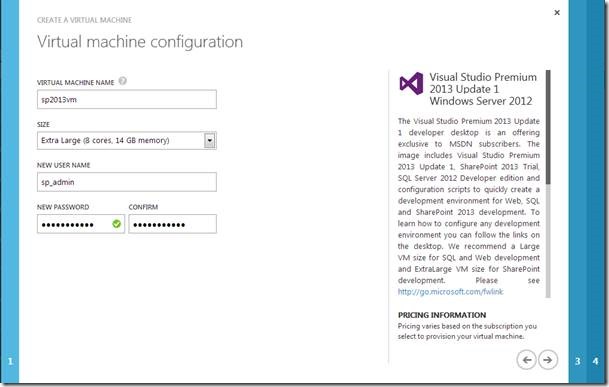
In this screen, you choose your computer name, administrator account name and password, and most importantly the size of the VM. Choose the Extra Large VM size.

Cloud configuration
clip_image008

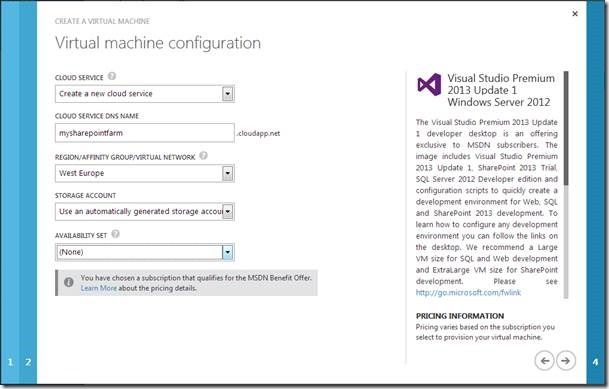
In the cloud configuration you specify the DNS name which you use to connect to the machine (RDP or HTTP). As this is my first VM in Azure, I created the cloud service and storage account automatically.

VM network configuration

clip_image010

In this last screen, you specify which ports will be mapped such that you can connect from the internet to your VM. As my company firewall blocks outgoing traffic on the RDP port, I map the RDP port to public port 443 (SSL). It can also be a good idea to add HTTP to this list, so you are able to use the SharePoint site from your browser without RDP.

Finish the Wizard, and your VM will be created. This can take some time, but in the meantime take the time to change the created storage settings.

Change storage to locally redundant.

Go in the Management Portal to Storage, and select the storage account which was created in the last step. Choose configure, and change Geo Redundant to Locally Redundant such that you will cut your storage costs in half (as it is only a dev test environment, I do not need my VM stored in two different locations). Save your settings.
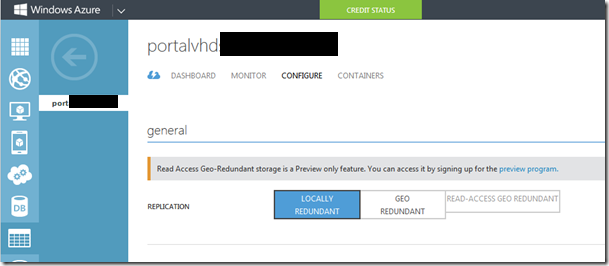
image

Connect to your VM

Now your VM is up and running, as Azure starts it automatically. Keep in mind that you pay for the VM per minute from the moment it is running.

RDP to the machine with your cloud service DNS name (and think about the port when you changed it from 3389 to something else). In this example, that is ‘mysharepointfarm.cloudapp.net’. Login with the credentials you set in step 2 of the wizard. You’ll have a nice SharePoint machine at your fingertips:clip_image014
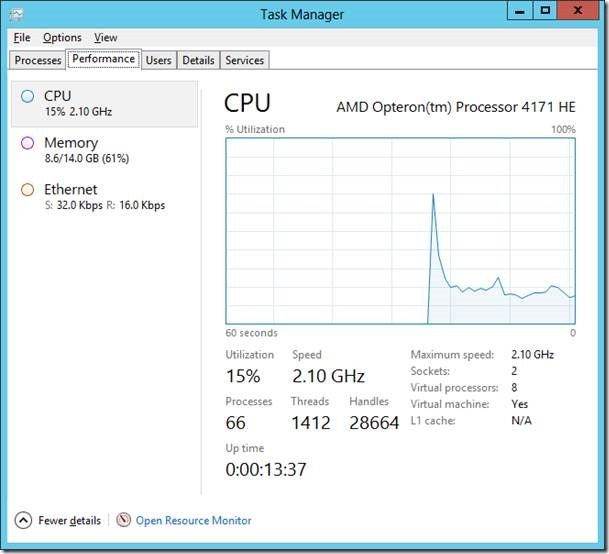
Create the farm

Your VM is started, SharePoint is installed as you see the icons of Central Administration and the product configuration wizard on the desktop, but there is no farm created yet. But on the desktop you find a shortcut to the Configure Developer Desktop. Inside that folder you find a Scripts map with three different scripts.
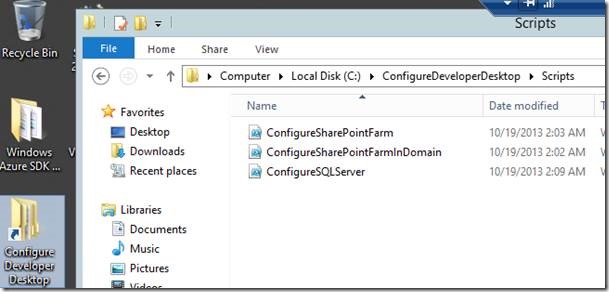
clip_image016 Start the PowerShell script ‘ConfigureSharePointFarm.ps1’ from the Shortcut found on the desktop to configure SQL and the SharePoint Farm.

This script will ask for a localSPFarmAccountName and a localSPFarmAccount password. It will create those accounts on the computer, configure SQL server, install a SharePoint farm and provision a developer site on http://localhost. This script will take some more time to run (I think it runs a complete SQL configuration on the background), so this is time to get some coffee. It will end with opening your newly created site collection.clip_image018
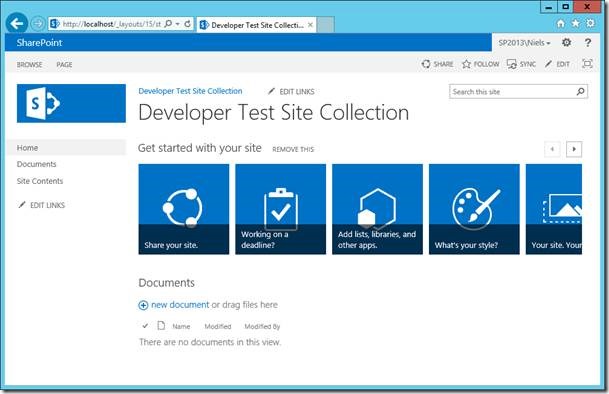
Costs

Again, keep in mind that you will pay your VM by the hour when it is running. So turn off your VM after use and power off the VM in the Management Portal when you’re done (otherwise your credits will be gone in a couple of days). I installed the Azure PowerShell tools, such that I can turn off your VM from my own computer with a simple Stop-AzureVM command.

As a Premium MSDN subscription will come with a monthly credit of €75, I estimated you can run your VM for about 175 hours.

Storage, first TB

€ 0.038 per GB per Month

127 GB

€ 5 per month

Transactions


Per transaction

€ 0.04 per hour?

Compute hours

MSDN rate

Per hour

€ 0.36 per hour

Data Transfer, first 10 TB

€ 0.09 per GB, first five free

Not much, but assume 15 GB

€ 1 per month

I’m not sure about how much transactions are used per hour. After two hours of usage, my bill was only € 0.02, so I estimate it on the safe side to € 0.04 an hour. So this means a €6 month fee, and a rate of €0.40 per hour.

Conclusion

When you are in the possession of a MSDN account, the SP2013 VM option is an excellent way to start developing and learning SharePoint 2013 without the need of expensive hardware. The other major benefit is that you have an environment up and running within the hour. You do not need to download or upload installation media, or install the bits yourself, which is a real time saver.

Wednesday, February 19, 2014

Quickly update WebPart titles by CSOM

While entering content for a new SharePoint section on a SharePoint 2010 publishing site, the content editors added a related articles webpart on about 100 pages. Too bad they didn't bother to change the webpart title, so I was asked to change change these titles, which had their default value, from a rather functional description of the webpart to something that makes a lot more sense in on the pages. As it should be possible to do it in CSOM, I created a small console application to achieve this.

Friday, December 20, 2013

Lightweight monitoring solution with PowerShell

For one of my projects, I needed a simple and lightweight monitoring and testing framework for the public website. As we tweaked SharePoint with some custom redirect functionality to improve SEO, and moved the Google Analytics code from one solution to one other, I wanted to make sure these functionalities still work after each release.
As UI bugs will be noticed directly, those more technical features are hardly noticed directly on failure. So there was the need to script and monitor those features.

As I wanted a simple, free and easy to expand solution (I worked with HostMonitor before, it's easy to write small tests there, but it isn't free), I decided to create my own PowerShell framework. Here it is. It is written for PowerShell 2.0, so webrequests are not executed with Invoke-WebRequest but with the C# System.Net variant.
The script is basically executing tests found in one folder, format the results as HTML and sending it by email with a SMTP server. Things to improve are more test outcomes (now it is Success or Failure, but there might be a yellow inbetween warning or so), or possibly using a tool like Selenium to run tests inside a browser session as well.

Tuesday, December 11, 2012

No search results on anonymous SP2010 website

Last week I had an issue with search on SharePoint 2010. It turned out that we didn't had any results on our public website with anonymous access. Results showed up in our authoring zone (with authenticated users).
A lot of the suggestions Google came up with weren't applicable in this situation. It turned out the Anonymous policy on one of the zones of the web application was 'Deny all'. This zone wasn't crawled, but the policy was still propagated to the index and used on the other zone. This meant that, as the content had a deny all flag for anonymous users, security trimming didn't allowed the return of any results.

Tuesday, June 5, 2012

Bug in Duet Enterprise NetWeaver configuration wizard

With Duet Enterprise FP1 came a wizard that lets you configure the settings for user mapping between SAP and SharePoint users. Duet Enterprise is using SAML tokens of SharePoint to single sign on these users to SAP. You can configure this mapping on the NetWeaver machine, but as described in the Duet Enterprise support blog, this mapping is case sensitive based on the values in the SAML token.

What turns out is that you can specify the user name prefix in the Configuration wizard, but the wizard always turns the characters to uppercase. So the wizard step is quite pointless, as you need to delete the user mapping and recreate it again with the proper casing with SPRO, SAP Reference IMG - SAP NetWeaver - Gateway - Configuration - Connection Settings - SAP NetWeaver Gateway to Consumer - Define Consumer Issuer Certificate & Map SAP User Names to Consumer.

Update: this behavior is addressed in SAP Note 1688843.

Thursday, March 1, 2012

MSOCAF false positives

I've been struggling with MSOCAF lately. It turns out that validation of the developed SharePoint solution is quite hard. And it turns out that the validation of the tools still has a lot of errors.
A couple of examples:
  • The tool implements SPDispose check. It is a fantastic tool to detect the right disposal of SharePoint objects, but sometimes it can't determine the context right. These errors are taged with 'could be false positive'
  • MSOCAF implements a couple custom FxCop rules, but these are the quite problematic ones. For example, it detects the usage of deprecated classes and members. It uses the list found on MSDN with deprecated members. But in the notes added, there is the source of errors:
    Note: Types and methods in the Microsoft.SharePoint.Portal namespace are not included in these lists because, with a few exceptions, the entire namespace has been made obsolete.
    What it means, the Microsoft.SharePoint.Portal namespace? If you look at the MSDN documentation, you see that all classes directly in this namespace are deprecated or internal. But the FxCop rule is implemented as (thank you Reflector):
    if (fullName.Equals(str3) || fullName.Contains("Microsoft.SharePoint.Portal"))
    . And here disaster strikes. My code use a new SP2010 class AverageRatingFieldControl. But as this one is in the Microsoft.SharePoint.Portal.WebControls namespace, it is marked as a deprecated class (see FxCop rule). And now I need time to justify the use of a deprecated method.
  • MSOCAF does like logging to ULS, no problem with that. It checks a couple of rules:
    1. detects if Unified Logging Service (ULS) logging is performed in every catch block.
    2. SPDiagnosticsService should be called at start and end of Timer Jobs, Event Receiver, Feature Receiver, and Web Services functions.
    3. Any errors happening in the Feature Receiver upon activation and deactivation should be logged to the ULS and the exception must be reported back to SharePoint.
    But as with logging in code, developers like to create a generic method for that, where my custom application categories will be set. But no, MSOCAF keeps complaining that your ULS is not filled with data. And again, inspecting the FxCop rules turns out that it expect you to directly call the SPDiagnosticsService.Local.WriteTrace method. As it checks the IL generated code, sometimes this won't check right in debug mode. Also, using properties as parameters in the WriteTrace function will mess with the callstack, and probably influence the outcome of the FxCop rule negatively.

Too bad that the rules used in MSOCAF still need some tweeking.

Sunday, December 4, 2011

Remove BDC Models in PowerShell

I needed a PowerShell script to enumerate over all the installed BDC Models (and delete them), but couldn't find the example on TechNet or MSDN. After trying some things, I found the following script:


$context = "http://sharepoint.local"
$bdc = Get-SPBusinessDataCatalogMetadataObject -BdcObjectType Catalog -ServiceContext $context
foreach ($model in $bdc.GetModels("*") ) {
    Remove-SPBusinessDataCatalogModel –Identity $model
}

Thursday, August 11, 2011

SharePoint File Upload

For some little functionality, I wanted to do a file upload to a document library by some custom .NET only code:


ListsSoapClient client = new ListsSoapClient();
XElement result = client.GetListItems("{642DF480-74CB-4EDC-865C-CA009054998F}", null, null, null, null, null, null);
XNamespace rs = "urn:schemas-microsoft-com:rowset";
XNamespace z = "#RowsetSchema";
var data = result.Descendants(rs + "data").Descendants(z+"row");

CopySoapClient copyClient = new CopySoapClient();
FieldInformation[] fields;
byte[] output;
uint result2 = copyClient.GetItem(Uri.EscapeUriString("http://example.hostname/"+"Documents/Report.xls"), out fields, out output);

string destinationUrl = "http://example.hostname/Documents/Test.xls";
string[] destinationUrls = { Uri.EscapeUriString(destinationUrl) };
List<fieldinformation> fieldsList = new List<fieldinformation>();

CopyResult[] copyResults;

uint result3 = copyClient.CopyIntoItems("+", destinationUrls, fieldsList.ToArray(), output, out copyResults);
WebRequest request = WebRequest.Create(destinationUrl);
request.Method = "PUT";
request.Credentials = CredentialCache.DefaultCredentials;
// Write the contents of the local file to the request stream.
using (Stream stream = request.GetRequestStream())
{
//Load the content from local file to stream
stream.Write(output, 0, output.Length);
}
WebResponse response = request.GetResponse();
response.Close();

Friday, August 5, 2011

Tips while working with SharePoint projects in VS2010

  • Install the CSKDev tools
  • Use quick deploy on the project to test small changes in markup and code
  • Page layouts don't support Intellisense when double clicking the aspx (VS2010 opens the file in textmode). Right-click and use 'View Code' or 'View Markup' will open the file as a webpage, with fill Intellisense support.
  • To start with already filled page layouts based on the content type, use the CSKDev 'Create page layout' on the content type in the Server Explorer.

Thursday, August 4, 2011

Get Taxonomy terms from the user while configuring a WebPart

In my current SharePoint 2010 project we make use of Managed Metadata terms a lot. We want to be able to select taxonomy terms while configuring WebParts, but the setup of the taxonomy field isn't quite straightforward. For the configuration of WebParts with exotic controls, you need to implement a custom ToolPart and link it to your WebPart. Because I think we will create a lot of custom ToolParts, I created a base class for displaying these taxonomy fields.

   1:  /// <summary>
   2:  /// This class makes it easier to work with Taxonomy data in a <see cref="Microsoft.SharePoint.WebPartPages.ToolPart">ToolPart</see>
   3:  /// </summary>
   4:  public class TaxonomyToolPart : ToolPart
   5:  {
   6:      /// <summary>
   7:      /// Gets or sets the name of the term store.
   8:      /// </summary>
   9:      /// <value>
  10:      /// The name of the term store.
  11:      /// </value>
  12:      public string TermStoreName { get; protected set; }
  13:      /// <summary>
  14:      /// Gets or sets the name of the term group.
  15:      /// </summary>
  16:      /// <value>
  17:      /// The name of the term group.
  18:      /// </value>
  19:      public string TermGroupName { get; protected set; }
  20:      /// <summary>
  21:      /// Gets or sets the name of the term set.
  22:      /// </summary>
  23:      /// <value>
  24:      /// The name of the term set.
  25:      /// </value>
  26:      public string TermSetName { get; protected set; }
  27:      /// <summary>
  28:      /// Gets or sets a value indicating whether multiple terms can be selected.
  29:      /// </summary>
  30:      /// <value>
  31:      ///   <c>true</c> if multiple terms can be selected; otherwise, <c>false</c>.
  32:      /// </value>
  33:      public bool MultiSelect { get; protected set; }
  34:   
  35:      private TaxonomyWebTaggingControl TaxonomyControl { get; set; }
  36:   
  37:      /// <summary>
  38:      /// Called by the ASP.NET page framework to notify server controls that use composition-based 
  39:      /// implementation to create any child controls they contain in preparation for posting back or rendering.
  40:      /// </summary>
  41:      protected override void CreateChildControls()
  42:      {
  43:          // create a panel that will hold all of our controls 
  44:          Panel toolPartPanel = new Panel();
  45:   
  46:          // create the actual control 
  47:          SPContext context = SPContext.Current;
  48:          SPSite site = context.Site;
  49:          TaxonomySession session = new TaxonomySession(site);
  50:          TermStore termStore = session.TermStores[TermStoreName];
  51:          Group group = termStore.Groups[TermGroupName];
  52:          TermSet productsTermSet = group.TermSets[TermSetName];
  53:   
  54:   
  55:          TaxonomyControl = new TaxonomyWebTaggingControl();
  56:          TaxonomyControl.ID = "taxonomyControl";
  57:          TaxonomyControl.SspId.Add(termStore.Id);
  58:          TaxonomyControl.TermSetId.Add(productsTermSet.Id);
  59:          TaxonomyControl.IsAddTerms = false;
  60:          TaxonomyControl.AllowFillIn = true;
  61:          TaxonomyControl.IsMulti = MultiSelect;
  62:   
  63:          TaxonomyControl.Text = GetTextFromWebPart(this.ParentToolPane.SelectedWebPart);
  64:   
  65:          toolPartPanel.Controls.Add(TaxonomyControl);
  66:   
  67:          // finally add the panel to the controls collection of the tool part 
  68:          Controls.Add(toolPartPanel);
  69:   
  70:          base.CreateChildControls();
  71:      }
  72:   
  73:      /// <summary>
  74:      /// Gets the textual representation of the selected terms from the WebPart and sets it on the Taxonomy control.
  75:      /// </summary>
  76:      /// <param name="webPart">The web part.</param>
  77:      /// <returns>a value from the webpart to select in the TaxonomywebTaggingControl</returns>
  78:      /// <remarks>Override this method in your child class to link the webpart property with the taxonomy field.</remarks>
  79:      /// <example>the term string has a value like 'Term 1|db61b704-cf1d-490d-bfc3-4cbcd8d2f453;Term 2|66b5696d-94a2-4299-ae34-63d3072ca357</example>
  80:      protected virtual string GetTextFromWebPart(WebPart webPart) { return string.Empty; }
  81:   
  82:      /// <summary>
  83:      /// Sets the textual representation of the selected terms from the Taxonomy control to the WebPart.
  84:      /// </summary>
  85:      /// <param name="webPart">The parent web part.</param>
  86:      /// <param name="selectedTerms">The selected terms.</param>
  87:      /// <remarks>Override this method in yout child class to link the taxonomy filed with the webpart property</remarks>
  88:      /// <example>the term string has a value like 'Term 1|db61b704-cf1d-490d-bfc3-4cbcd8d2f453;Term 2|66b5696d-94a2-4299-ae34-63d3072ca357</example>
  89:      protected virtual void SetTextToWebPart(WebPart webPart, string selectedTerms) { }
  90:   
  91:      /// <summary>
  92:      /// Called when the user clicks the OK or the Apply button in the tool pane.
  93:      /// </summary>
  94:      public override void ApplyChanges()
  95:      {
  96:          WebPart webPart = this.ParentToolPane.SelectedWebPart;
  97:          SetTextToWebPart(webPart, TaxonomyControl.Text);
  98:      }
  99:  }

This base class can now be used in a new class, where the configuration of the ToolPart and the linking with the WebPart needs to be implemented:

   1:  public class TestToolPart : TaxonomyToolPart
   2:  {
   3:      public TestToolPart()
   4:      {
   5:          this.TermStoreName = "Managed Metadata";
   6:          this.TermGroupName = "NL";
   7:          this.TermSetName = "Brand";
   8:          this.MultiSelect = true;
   9:          this.Title = "Taxonomy Example";
  10:      }
  11:   
  12:     protected override string GetTextFromWebPart(Microsoft.SharePoint.WebPartPages.WebPart webPart)
  13:      {
  14:          return ((TestWebPart)webPart).Text;
  15:      }
  16:   
  17:      protected override void SetTextToWebPart(Microsoft.SharePoint.WebPartPages.WebPart webPart, string selectedTerms)
  18:      {
  19:          ((TestWebPart)webPart).Text = selectedTerms;
  20:      }
  21:  }        

The only thing you need to do is override the GetToolParts() in your WebPart to inject your custom ToolPart in the ToolPart array, and your ToolPart should work.

Sunday, January 23, 2011

Enhanced ASP.NET input sanitation with AntiXSS

Need for input sanitation

The applications you build for the internet can have quite a big audience. It is possible for the whole connected world to visit your website and use the app you built on it. But with these visitors, you will attract dark forces who can misuse your application for their own agenda. It is therefore needed to harden your application, and be sure no-one can send email, inject custom HTML and javascript and hijack user information. It is needed you built secure code and protect yourself.

The main characteristic of an application is that it needs input data from the end user. With this input data, something is done. If this data is sent back to the user, is can be displayed on the screen. In it most simple form, this looks like:


<div>
<asp:TextBox ID="inputBox" runat="server" TextMode="MultiLine" />
<br />
<asp:Button ID="submitButton" runat="server" Text="Submit"
onclick="submitButton_Click" />
<br />
<asp:Label runat="server" EnableViewState="True" AssociatedControlID="resultLiteral" Text="Html output:" />
<asp:Literal ID="resultLiteral" runat="server"></asp:Literal>
</div>


With the following button_click code:


protected void submitButton_Click(object sender, EventArgs e)
{
string input = inputBox.Text;
string output = input;
resultLiteral.Text = output;
}


With this example code, it is possible to inject javascript into the response. Try pasting <script language="javascript">alert('Hello World!');</script> in the input box and see.

Out of the box ASP.NET functionality

With the standard ASP.NET setup, the last script example didn’t worked, but threw an exception with the message ‘A potentially dangerous Request.Form value was detected from the client (inputBox="<script language="ja...").’. This is because out of the box, ASP.NET will scan each input parameter to dangerous characters. But don’t let this filter mislead you. The default characters will be the less than character (<) and some ampersand-hash encoded characters. There are also scenario’s you will be switching off the request validation. Simply because some business scenario (maybe you want some html from your user).

You can switch your validation off for all your pages in ASP.NET in the web.config, or specify ValidateRequest="false" in the page directive for the specific page you want to disable this check (note that in ASP.NET 4, there are some additional steps needed). But don’t rely on request validation to heavily, because there are situations in can’t detect malicious input.

Shortcomings of Request Validation

Think about the following situation. You want the user of your site to specify the background color of an element on your page, and you use the following submit event:

protected void submitButton_Click(object sender, EventArgs e)
{
string color = inputBox.Text;
string output = "<div style=\"width:200px;height:200px;background-color:" + color + ";\">Colored Box</div>";
resultLiteral.Text = output;
}


Because the input is directly pasted into an attribute of the div tag, you don’t need HTML directly to inject javascript. The following line will pass through input validation, and inject the page with some potentially evil javascript:
red;" onclick="alert('Hello World!');" "
/


Filtering input

The first thing to prevent the injection of those unwanted code, is to filter the user input if used for generating output. Standard built-in in ASP.NET is the HttpUtility class with some Encoding methods. They can help with the above two attacks, but it is still possible to inject URL backgrounds in the second example. Because these filters are limited in usage, Microsoft started a new library quite some time ago.

AntiXSS library

The two main features in the AntiXSS library are the Encoder and Sanitizer classes. Like the HttpUtility, the encoder class has several specific Encoding methods. These methods are a lot more specific than HttpUtility though. In the second example, it is possible filter the color input with a call to Encoder.CssEncode. The output will be CSS encoded into ‘red\00003B\000022\000020onclick\00003D\000022alert\000028\000027Hello\000020World\000021\000027\000029\00003B\000022\000020\000022’.

The Sanitizer class is even more powerful. It can strip certain HTML tags out of the input. It can transform <script language="javascript">alert('Hello World!');</script><strong>bla</strong><img src="bla.gif" /><ul><li>one<li>Two<li>Three</ul> into <strong>bla</strong><img src="bla.gif"> <ul> <li>one</li><li>Two</li><li>Three</li></ul>


Install AntiXSS with NuGet

AntiXSS used to be a very hidden gem somewhere deep on Microsoft Download or CodePlex. But with the new NuGet, it is on page one of packages. First you need to install NuGet into your Visual Studio. After that, right click your project and choose ‘Add Library Package Reference’.


imageimage


As of today, AntiXSS is the eighth package in the list. If you click install, all assemblies for AntiXSS will be automatically downloaded and added to your solution. So it won’t be very hard anymore to write really secure code!

Wednesday, December 15, 2010

Conversion of a RTF document to PDF with C#

In my current project, I need to convert in an easy way RTF documents to PDF from managed code. I don't want to rebuild these documents in PDF, because the RTF's still have some need in the application.

After google-ing around for possible solutions, I tried two components: the last version of iTextSharp with RTF support (from version five on, the RTF support is split into a new project and removed from iTextSharp) and Aspose.Words.

After a quick conversion with iTextSharp, I understand why RTF support was dropped. The produced PDF was one piece of garbage. The code I used was:

using (FileStream outstream = File.Create(outFile))
{
Document docText = new Document();
PdfWriter writer = PdfWriter.GetInstance(docText, outstream);
docText.Open();
RtfParser rtf = new RtfParser(null);
using (FileStream rtfStream = File.OpenRead(inFile))
{
rtf.ConvertRtfDocument(rtfStream, docText);
}
docText.Close();
}


Aspose.Words worked like a charm, while using only two lines of code:

Aspose.Words.Document doc = new Aspose.Words.Document(inFile);
doc.Save(outFile, SaveFormat.Pdf);

The only drawback is iTextSharp is OpenSource and Aspose.Words isn't. But I guess there isn't another reliable OS alternative.

Thursday, August 19, 2010

VBScript to detect if there is a COM+ application instance running

I had to figure out how to query the COM Administration catalog to detect if there is a specified COM+ application running.
Here is the quickly written vbscript:

running = False
Dim oCatalog
Set oCatalog = CreateObject("COMAdmin.COMAdminCatalog")
sName = "Tridion Content Manager"
Dim result
set apps = oCatalog.GetCollection("Applications")
apps.Populate

For Each app In apps
  If app.Name = sName Then
    Set objAppInst = apps.GetCollection("ApplicationInstances",app.Key)
    objAppInst.Populate
    for each inst in objAppInst
      pId = inst.Value("ProcessID")
      running = not ( inst.Value("IsPaused") or inst.Value("HasRecycled"))
      if running then
        Exit For
      end if
      Set objAppInst = nothing
    Next
    Exit For
  End If
Next
set apps = Nothing
set oCatalog = nothing
MsgBox pid & " " & running

Wednesday, August 11, 2010

Migrating Tridion templates from 5.2 to 2009

Upgrading a Tridion environment from Tridion 5.2 SP1 to Tridion 2009 SP1 isn’t a straightforward procedure, especially when you have to cope with a lot of custom functionalities. In this post, I write down some experience whith the upgrade of the old templating framework to a new one.


Tridion 5.2 situation


The templating framework used in 5.2 (pre-compound templating) was we built as a ScriptExtension in C#, and this ScriptExtension was registered one in the Tridion MMC snap-in. All the present VBScript based templates call this ScriptExtension with some templating parameters. This templating setup is very easy to deploy (register one dll and you're ready to go),


The drawback of this solution was the usage of the Tridion COM API, and the managed to native interop issues you have to deal with (like releasing your references to COM objects), but with Tridion 5.2 (and before that, with Tridion 5.1SP4) it worked.


First try, migrating this solution to 2009 SP1


While building our solution with Tridion 5.1SP4 and 5.2SP1, you had to built the Interop assemblies yourself. With version 2009, Tridion delivered these in the bin\client folder of the Tridion installation. Linking the existing solution to these new assemblies, fixing small API changes and recompiling the whole worked like a charm. But testing the code gave some major issues. The internals of the deployment packages changed for binaries and was killing the custom metadata for indexing purposes. But the whole publishing process became a large memory hog. So it was needed to rewrite the solution (or restart the TDSE process once in a short while). That was basically what was done, the legacy rendering and publishing was ditched for the new way of publishing and rendering content.

Monday, July 5, 2010

Upgraded Certification


With the new version of the .NET Framework, I needed to upgrade my .NET Certifications to this new version. A couple of months ago, I did the beta versions of these exams, and last week I got the results. I passed all the exams I did. They were not easy, so I was quite surprised to receive all the results positively back.

Monday, January 18, 2010

Updated XSLT for CC.NET in SharePoint

Just modded my XSLT for viewing the CC.NET status of the buildserver in the XML Webpart of Sharepoint 2007:


<?xml version="1.0" encoding="utf-8"?>
<xsl:stylesheet version="1.0" xmlns:xsl="http://www.w3.org/1999/XSL/Transform">
  <xsl:output method="xml" encoding="utf-8" indent="yes" omit-xml-declaration="yes" />
  <xsl:template match="/">
    <table border="0" cellpadding="0" cellspacing="0">
      <thead class="ms-viewheadertr">
        <th style="text-align:left;" scope="col" class="ms-vh2-nograd" nowrap="nowrap">Project</th>
        <th class="ms-vh2-nograd" >&#160;</th>
        <th style="text-align:left;" scope="col" class="ms-vh2-nograd" nowrap="nowrap">Status</th>
        <th class="ms-vh2-nograd" >&#160;</th>
        <th style="text-align:left;" scope="col" class="ms-vh2-nograd" nowrap="nowrap">Last buildtime</th>
        <th class="ms-vh2-nograd" >&#160;</th>
        <th style="text-align:left;" scope="col" class="ms-vh2-nograd" nowrap="nowrap">Buildlabel</th>
        <th class="ms-vh2-nograd" >&#160;</th>
        <th style="text-align:left;" scope="col" class="ms-vh2-nograd" nowrap="nowrap">Activity</th>
      </thead>
      <tbody>
        <xsl:apply-templates select="/CruiseControl/Projects/Project">
          <xsl:sort select="@name"/>
        </xsl:apply-templates>
      </tbody>
    </table>
  </xsl:template>
 
  <xsl:template match="Project">
    <tr>
  <xsl:if test="position() mod 2 != 1">
    <xsl:attribute  name="class">ms-alternating</xsl:attribute>
  </xsl:if>
      <td class="ms-vb2" align="top" nowrap="nowrap">
        <xsl:element name="a">
          <xsl:attribute name="onfocus">OnLink(this)</xsl:attribute>
          <xsl:attribute name="href">
            <xsl:value-of select="@webUrl"/>
          </xsl:attribute>
          <xsl:attribute name="onclick">GoToLink(this);return false;</xsl:attribute>
          <xsl:attribute name="target">_self</xsl:attribute>
          <xsl:value-of select="@name"/>
        </xsl:element>
      </td>
      <td>&#160;</td>
      <xsl:element name="td">
        <xsl:attribute name="class">ms-vb2</xsl:attribute>
        <xsl:attribute name="align">top</xsl:attribute>
        <xsl:attribute name="style">padding-bottom: 3px;
        <xsl:choose>
          <xsl:when test="@lastBuildStatus='Failed'">
            color:red;
          </xsl:when>
          <xsl:when test="@lastBuildStatus='Exception'">
            color:red;
          </xsl:when>
          <xsl:when test="@lastBuildStatus='Unknown'">
            color:yellow;
          </xsl:when>
          <xsl:when test="@lastBuildStatus='Failure'">
            color:red;
          </xsl:when>
          <xsl:otherwise>
            color:green;
          </xsl:otherwise>
        </xsl:choose>
        </xsl:attribute>
        <xsl:value-of select="@lastBuildStatus"/>
      </xsl:element>
      <td>&#160;</td>
      <td class="ms-vb2" style="padding-bottom: 3px;" align="top">
        <xsl:value-of select="substring-before(@lastBuildTime,'T')"/>&#160;
        <xsl:value-of select="substring-before(substring-after(@lastBuildTime,'T'),'.')"/>
      </td>
      <td>&#160;</td>
      <td class="ms-vb2" style="padding-bottom: 3px;text-align:right;" align="top">
        <xsl:value-of select="@lastBuildLabel"/>
      </td>
      <td>&#160;</td>
      <xsl:element name="td">
        <xsl:attribute name="class">ms-vb2</xsl:attribute>
        <xsl:attribute name="align">top</xsl:attribute>
        <xsl:attribute name="style">
          padding-bottom: 3px;
          <xsl:choose>
            <xsl:when test="@activity='Building'">
              color:red;
            </xsl:when>
           <xsl:when test="@activity='CheckingModifications'">
            color:yellow;
          </xsl:when>
            <xsl:otherwise></xsl:otherwise>
          </xsl:choose>
        </xsl:attribute>
        <xsl:value-of select="@activity"/>
      </xsl:element>
    </tr>
  </xsl:template>
</xsl:stylesheet>

Saturday, October 24, 2009

Getting Hippo Site Toolkit demo to work

While figuring out Hippo and its architecture, I found some annoying errors in the documentation. While the documentation at http://www.onehippo.org/site-toolkit/home reads:
1. Download the wars, drop them in your Tomcat servlet container and start Tomcat (see in_servlet_container, but with different wars).
2. Checkout the HST2 project, start the cms and the site of the demosuite in the buildin Jetty servlet container.

So I use Tomcat, and its saying in another page to rename the cms war to cms.war, there is no mention of renaming the site war to site.war. But in the rest of the documentation the assumption is made to use the /site URL. I'm no Tomcat guru, so how should I know that the webapp wars are used as URI shortcuts ;).

But that's the main pain in the ass with OSS documentation, it's mostly incomplete. How hard should it be to test your HOWTO for a plain and simple demo. Adding a simple step 1.5: "rename the cms war to cms.war and the site war to site.war" isn't a big deal, but makes a difference of about 1 hour for a Hippo n00b figuring out what's going on!

Wednesday, September 30, 2009

Demo Parallel Extensions .NET 4.0

Yesterday I a gave a presentation/demonstration about the upcoming .NET 4.0 framework release. Unfortunately, there wasn't enough time to show the complete parallel demo. Here I show a couple of ways to display all integers between 0 and 100 that are dividable by 10.


class Program
{
// objects for classic parallel code
static object locker = new object();
static Queue<int> integers;
//with concurrent Queue, we don't need a locker
static ConcurrentQueue<int> concurrentIntegers;

static void Main(string[] args)
{
int steps = 100;
steps.WriteOnConsole(); //extension method to display an integer on the console
Classic(); //classic for loop, no parallel code
ClassicParallel(); //classic parallel invocation

New(steps); //parallel for loop
NewMoreLikeClassic(steps); //parallel the new way, but looks like classic parallel

Linq(steps); //old LINQ way
PLinq(steps); //new Parallel LINQ
}

private static void Classic(int steps = 100)
{
for (int i = 0; i < steps; i++)
{
if (i % 10 == 0)
{
i.WriteOnConsole();
}
}
}

private static void ClassicParallel(int steps = 100)
{
integers = new Queue<int>(steps);
// fill the queue with all integers
for (int i = 0; i < steps; i++)
{
integers.Enqueue(i);
}

int workerCount = 5; //arbitrary number for workercount.
Thread[] workers = new Thread[workerCount];
// Create and start a separate thread for each worker
for (int i = 0; i < workerCount; i++)
{
workers[i] = new Thread(Consume);//.Start();
}
foreach (Thread worker in workers)
{
worker.Start();
}
}

private static void Consume()
{
while (true)
{
int i;
lock (locker)
{
if (integers.Count == 0) return; // run until the queue is empty
i = integers.Dequeue();
}
if (i % 10 == 0)
{
i.WriteOnConsole();
}
}
}

private static void New(int steps)
{
ParallelLoopResult result = Parallel.For(0, steps, (i, loop) =>
{
if (i % 10 == 0)
{
i.WriteOnConsole();
}
//With the LoopState, we can break and terminate the processing of the loop
if (i == 50)
{
loop.Break();
}
}
);
Console.WriteLine("Completed: {0}, Breaked at iteration {1}",
result.IsCompleted,
result.LowestBreakIteration);
}

private static void NewMoreLikeClassic(int steps = 100)
{
concurrentIntegers = new ConcurrentQueue<int>(Enumerable.Range(0, steps));
Parallel.Invoke(() =>
{
ConsumeQueue();
}
);
}

private static void ConsumeQueue()
{
// note: there is no locking used here, because we use a ConcurrentQueue
int i;
bool success = concurrentIntegers.TryDequeue(out i);
if (success && (i % 10 == 0))
{
i.WriteOnConsole();
}
}

private static void Linq(int steps)
{
Enumerable.Range(0,steps).Where(i => i % 10 == 0)
.ToList<int>().ForEach(i=>i.WriteOnConsole());
}

private static void PLinq(int steps)
{
Enumerable.Range(0, steps).Where(i => i % 10 == 0).AsParallel()
.ToList<int>().ForEach(i => i.WriteOnConsole());
}
}